Most "AI sales agent" tutorials end with a Markdown plan.
You read it, nod, and never ship. The work of actually wiring an agent to actual data and tools is left as an "exercise to the reader."
This post is the exercise.
In the next 60 minutes, you will install Claude Code, clone our open-source starter kit, connect the MCPs that actually run outbound, customize one skill, and run your first end-to-end test on a real lead.
The output is a working outbound AI agent that drafts personalized cold email sequences against your live ICP and tool stack.
It runs as software on your machine, not another deck or demo.
If you have a coffee, a working laptop, and the accounts you already signed up for at outbound tools, you have everything you need.
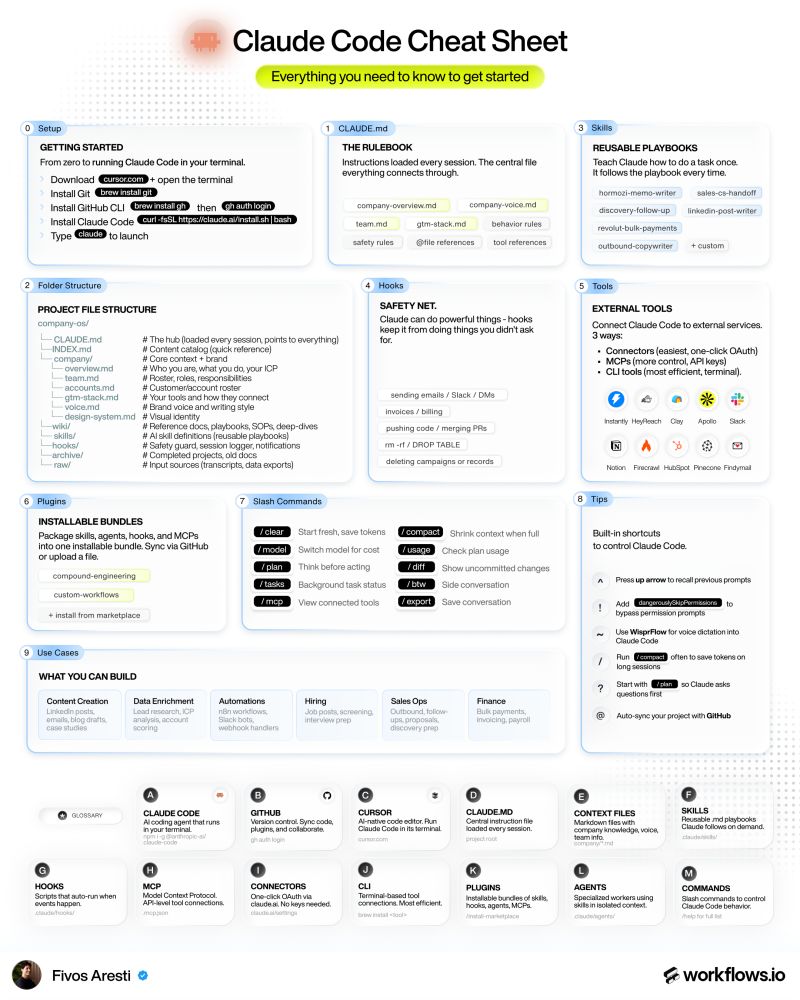
What an outbound AI agent actually is
An outbound AI agent is a Claude Code skill that runs your outbound workflow end-to-end against connected tools.
A few different things often get bundled under the "AI agent" label:
- A prompt is one-shot input you type. It does not store memory or integrate with your tools, and the team cannot reuse what you wrote.
- A GPT or Claude project is a chat with stored context. Better than a prompt, but it still ends at draft generation.
- An AI agent is a versioned skill that pulls live data through MCPs, runs the workflow, and outputs reviewed work the team can call from the terminal.
The agent we will build today is the third kind.
It uses the outbound-copywriter skill from our Company OS Starter Kit on GitHub. The skill calls Apollo for contact data, queries past sequence performance, and drafts a personalized cold email sequence in your voice.
For the full library this skill comes from, see the Claude Code skill library breakdown.
What you need before you start
Get these in tabs before the timer starts.
Software:
- A Mac, Linux box, or WSL on Windows
- Git installed (
git --versionshould return something) - Node.js 18 or later
- Cursor or VS Code (optional but recommended)
Accounts:
- A GitHub account
- An Anthropic account with Claude Code access
- An Apollo seat (free tier works for the first build)
- A Findymail account for email verification
- An Instantly account with at least one warmed-up domain
You do not need HeyReach, HubSpot, or BetterContact for the first build. Add those once the core agent is shipping.
The 60-minute build
Five steps. The clock starts when you have everything in tabs.
Step 1: Install Claude Code
Open a terminal and run the install commands:
Type claude to launch. Authenticate with your Anthropic account.
When the prompt loads, type /help to confirm Claude Code is alive. You should see the command list.
That is your foundation. Everything else builds on top.
Step 2: Clone the Company OS Starter Kit
In a new terminal tab, clone the workflows.io starter kit:
Open the folder in Cursor or VS Code. Skim the structure:
company/for shared knowledgegtm-skills/for the five core skills we covered in the Claude Code skill library breakdownwiki/for SOPsclients/for per-client context
The skill we are using today is gtm-skills/outbound-copywriter.md.
For the full architecture rationale, see how to build a Company OS on GitHub.
Step 3: Connect your outbound MCPs
MCPs are how Claude Code reaches into your tools. For an outbound agent, three MCPs cover the basics:
- Apollo MCP for contact and company data
- Findymail MCP for email verification
- Instantly MCP for sequence push
Each MCP installs through Claude Code's claude mcp add command. The Apollo MCP is the longest of the three because it needs your API key and base URL configured.
Test each connection before moving on. From the Claude Code prompt, ask:
"Use Apollo to find five contacts at Stripe in the engineering function."
If the response shows real Apollo data, the MCP is wired correctly.
Repeat for Findymail and Instantly. If a tool returns an error, check the API key first, then the rate limits.
Step 4: Customize the outbound copywriter skill
Open gtm-skills/outbound-copywriter.md.
The starter kit ships with a generic voice guide and ICP. You will replace those with your team's actual content across four sections of the skill file.
Voice guide: Paste your highest-performing past sequence near the top of the skill so the agent has an example of how your team writes. If you do not have past sequences, pick a cold email you recently received and would have replied to.
ICP definition: Write the firmographic and behavioral signals that define your Tier 1 accounts. Industry, headcount range, recent triggers like funding or hires, tech stack signals.
CTA preference: Document your default first-touch CTA in plain language. The skill will use that CTA in every sequence it drafts.
Sequence length: Set the default touch count, usually three or five, so the agent ships sequences that match your standard cadence.
Save the file and commit it back to your repo so the skill stays versioned.
Step 5: Run your first agent test
Pick a real lead from Apollo. Copy the LinkedIn URL.
In Claude Code, prompt:
"Run the outbound-copywriter skill for [LinkedIn URL]. Generate a three-step sequence."
The agent will pull the contact and company data through Apollo, verify the email through Findymail, query the voice guide and ICP signals from the skill, and draft a three-touch sequence in your voice.
Review the output.
The first run usually needs corrections. Tone might drift too formal because the agent over-corrected on professionalism. The opener might lean on a generic compliment instead of a specific observation about the company.
Edit the skill file with the corrections. Re-run.
The output will be sharper because the skill is now versioned with the new instructions.
The 60 minutes are up. You have a working outbound AI agent.
What to do after the first 60 minutes
The first agent is the easiest one to build. The next ones get harder because the value comes from coverage, not the first install.
A few next moves that compound:
- Add the icp-modeller skill so the same definitions feed every campaign
- Connect HubSpot so the agent writes leads back into your CRM with tier scoring
- Add Pinecone for the campaign performance database the copywriter skill queries on subsequent runs
- Wire HeyReach if you run LinkedIn outbound alongside email
For the full menu of plays the agent can support, see our GTM workflows library and the cold outreach message playbook.
Conclusion
Teams often spend a month researching whether to build an outbound AI agent. Sixty minutes is what it actually takes to ship the first one.
The first agent is the unlock. Once it runs, the next four skills take less time each because the patterns repeat.
By the end of the month, you have a Claude Code skill library running every step of your outbound motion.
If you want help wiring this into your stack faster, book a strategy call. We can walk through your current outbound workflow and map which skills to ship first.